Whoever would think one of the most important aspects of software development is the writing of test cases? It’ll come as no surprise that I am one of those who thinks it’s very important. And I’ll even go so far as to say the writing of a test case can either make or, if done badly, break a release.
I’ve been in software testing for over twenty years and have seen a plethora of test cases. Some have been near-perfectly written. Others, not so much. And for the latter group, the end result is poor quality testing, poor tracking of issues, and frustrations between QA, product and development teams because it wasn’t clear at the outset what was being tested and for what reason.
But before I go into how we write test cases at Digivante, let’s cover a bit of background.
What exactly is a test case?
A test case is a detailed written explanation of a specific scenario that you want to test, written step by step with expected outcomes at each stage. Say, for example, you wanted to test a new visitor to your site purchasing a specific item via PayPal – you’d detail those steps starting with the very basic, “Go to [URL].com” all the way through to “Complete payment on PayPal”.
Test cases are used to test any type of software. From popular applications like Microsoft Office, to ecommerce websites, to popular iOS or Android apps – all will have hundreds if not thousands of test cases to run.
Test cases are used pre-release to ensure that the release is ready to go into the world, but also test cases can be run post-launch too. We’ve worked with clients to monitor their live site by testing key user journeys on a daily basis to report issues impacting availability or customer experience.
Test cases always have an outcome. If the test case is successfully run i.e. the steps were followed without incident at any stage, it will pass. If at any point it fails at one of the stages, it’s logged as an issue with steps to reproduce it and related image/video evidence. There are a whole range of types of issue too: functional, usability, accessibility, security are just some.
What test cases are not
To be clear, test cases are not the same as test scripts. Nor are they scenarios or use cases or plans for that matter.
Test scripts are very similar to test cases – and arguably could be the same thing – but we more commonly use test scripts when we’re referring to test automation. Because automated tests involve a machine running the test rather than a human, a test script needs to be written for the machine to know how to run the test. At Digivante, when we create automated scripts, they are always written based on a test case. We write our test cases the way that we do, to ensure automation testers can refer directly to the test case rather than the requirement, thus not duplicating effort or wasting time on prep work for the automation script. If an automation script is proving to difficult or taking longer than expected to create, we can always run the test case manually.
Test scenarios are what test cases are created from. For example, a scenario might be, “Check behaviour when a valid email but invalid password is entered.” This is stating the main reason for the test but is not outlining the steps to run that test.
A use case is a description of how software should perform under given conditions. It describes how a product will or should work. Let’s take an ecommerce fashion company as an example. A use case might be, “A customer clicks on an item to select the specific colour and size they wish to purchase. The ‘Add to shopping basket’ button should only appear if the item is in stock and available at the warehouse.” Like a scenario, a use case is what you can build your test case from.
A test plan is a very detailed, dynamic document that outlines your overall test approach. It would include your objectives for testing, the schedule and estimated timeline, what resources are required to deliver the plan.
The different types of test cases
There are lots of different types of test cases to cover requirements such as:
Functionality – to test whether software functions perform in the way expected.
User interface – to check for grammar and spelling, visual inconsistencies e.g. colour, find broken links.
Security – to check whether the system protects data, so test cases will look at authentication and/or encryption.
Integration – to check how different software interacts with one another. This might include your website interacting with an order processing system or a payment system, for example.
Usability – to check how users might use your application to complete a particular task e.g. purchase a pair of shoes.
User acceptance swiftly follows usability – where business users test the system to ensure it works as per users requirements.
Regression – checks whether new code changes have affected any existing features.
Those are just a few of the different types. This TechTarget articles covers different types of test cases in more detail.
The art of test case writing. What’s in a name?
Now we’ve covered the background to test cases, I’d like to delve into how we do things here at Digivante.
When it comes to test case writing, a lot can be derived from its name. When my team writes test cases the first step is always the name, and while this might seem trivial, in my view it is a critical point in showing your understanding the aim of the test case and the coverage it provides.
Through a static review of the requirements, you start to form an understanding of the changes, required coverage for your test case, questions for product owners and developers, so that a detailed step-by-step test case can be written.
Structuring test case names
At Digivante we structure our test case names in a very specific way.
Step 1:
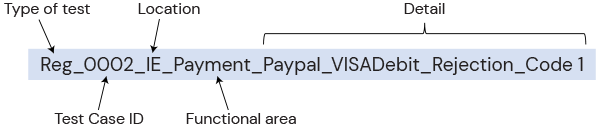
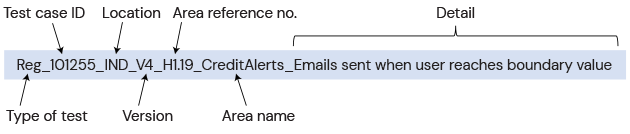
We start with the type of test i.e. Regression (Reg), new functionality (NF), cross browser (CB) etc.
Step 2:
Agree the format for Test Case ID. Usually this is a numerical value e.g. 0001, 0002 and so on.
Step 3:
Location code is added if the test is being run in different countries (e.g. payment tests)
Step 4:
Next, we consider the functional area. This is the high-level area that a requirement exists under.
Often product owners are responsible for specific features, so it’s important to be able to quickly identify test cases that provide coverage for them, and it also means related issues are traceable back to these specific features.
Product owners can use results to identify high and low risk areas and assess volatility to change. Each feature will contain functional areas, which are a more granular breakdown.
Step 5:
Finally we add the detail of the test case and the aim of what it’s covering.
To illustrate what this looks like in reality:
Standard format
Client specific format
Sometimes it is required that we add additional information to the test case titles on a client specific basis such as in the below example:
All of the above allows us to quickly assess test coverage via a related coverage matrix.
What’s a coverage matrix?
We use a Coverage Matrix to ensure the test cases we write cover all the areas adequately. Once complete, it allows all stakeholders to understand the coverage when a set of test cases is executed.
The Coverage Matrix covers each variable to be considered in testing and the test case’s status for each; this helps ensure that all relevant test scenarios are included and can be a great exercise to go through to ensure full, efficient coverage during existing test pack reviews.
Using the Coverage Matrix can also help identify which test cases are to be used for different test approaches as you may want to run only a subset of the test pack, based on the new functionality being introduced.
The Coverage Summary is used in conjunction with this to provide as a high-level overview, typically at a reporting level rather than technical level, to ensure the right level of focus is in the right areas.
Having the name underscore separated allows us to quickly separate the test name in Excel, which creates the coverage matrix. Then using pivot tables allows for a volumetric breakdown of the coverage.

The optimal test case format
As I mentioned at the start of this blog, we’ve defined a very specific method of writing test cases at Digivante. We write in incredible detail, with the main purpose being that the test case can be interpreted clearly and easily by a human, but also can easily be coded for an automation script in the future.
A test case is made of prerequisites, steps and expected outcomes.
Prerequisites
This is a dependency that needs to be in place before a test case can be run i.e. data setup, content, config, environment etc. A prerequisite might be to ensure you have a specific device or operating system to use, or that you must first install a certain data set.
Steps
A test step details what a tester needs to do. Each step details a specific task. First step could be something as simple as, “Open your browser.”
A set of sequential steps should take the user on a functional journey to meet the requirement of the test case.
Expected outcome
Here we ensure that we explain to the tester exactly what we expect the outcome of each and every step of the test, leading to the very final outcome at the end.
An example test case
Here’s an example test case we have written at Digivante.
You can see the granular detail in each step, and the expected results each time. During the execution of each test step the tester is requested to supply a comment, screenshot and/or video along with the Actual outcome of the test. If the Actual outcome differs from the Expected outcome then the test step either fails, causing the test case to fail, or the step passes with issue, causing the test to continue but a non-blocking issue is raised.
| Name | Action | Expected outcomes |
|---|---|---|
| Pre-reqs Value | If you are running the test on mobile/ tablet, please note that you need both Wi-Fi and 3G/ 4G internet for this test.
1) Please clear cache/ cookies and run on an incognito browser 2) When testing on mobile, please check both portrait and landscape modes 3) Some steps are for mobiles/ tablets only, if running on desktop, please add a comment stating ‘n/a’ and mark the step as passed 4) If you are redirected to a LIVE site, just manually update the front part of the URL. For example: “https://examplesite.com/help/” to “https://URL” it will lead you back to the test site. |
You have both Wi-Fi and 3G/ 4G options to connect from on the mobile/ tablets.
You have read and understood all the points |
| Step 1 | Launch the test site “https://URL”
NOTE: If running the test on the mobile/tablet, start the test connected to your Wi-Fi. |
Homepage is displayed without any issues |
| Step 2 | Scroll to the bottom of the page to switch to Spanish site (España) | User is able to switch to Spanish site (España) through the country selector on the footer |
| Step 3 | Navigate to “https://URL” | The product page is displayed |
| Step 4 | Observe the images on the product page.
Click on different images to ensure that it loads without any issues (check both portrait and landscape modes for tablets and mobiles) |
Images on the product page are displayed without any issues |
| Step 5 | On the image carousel, click on the video (listed at the end).
Check if you are able to zoom in and close zoom on the rotating image/ video |
Video (rotating image) loads without any issues |
| Step 6 | For mobile and tablet users, switch to your mobile 3G/4G on this step.
Note: If you are running the test on desktop, please add a comment stating ‘n/a’ and mark the step as passed. Add a screenshot from previous steps. |
User has switched to 3G/ 4G on mobile/ tablet |
| Step 7 | On the same product page, check if the images load without any issues.
Note: If you are running the test on desktop, please add a comment stating ‘n/a’ and mark the step as passed. Add a screenshot from previous steps. |
Images on the product page are displayed without any issues when on 3G/4G |
| Step 8 | On the image carousel, click on the video (listed at the end).
Check if you are able to zoom in and close zoom on the rotating image/ video. Note: If you are running the test on desktop, please add a comment stating ‘n/a’ and mark the step as passed. Add a screenshot from previous steps. |
Video (rotating image) loads without any issues when on 3G/4G |
| Step 9 | For mobile and tablets, check the images and the rotating image/ video on landscape mode as well.
Note: If you are running the test on desktop, please add a comment stating ‘n/a’ and mark the step as passed. Add a screenshot from previous steps. |
The PDP and images look fine on both portrait and landscape modes Add a screenshot on landscape mode on this step |
| Step 10 | Thank you for running this test. |
Tracking test case outcomes
We write our test cases in Gherkin, and they are loaded into our portal. By having them in our testing portal, not only can we set test cases to run with our community at speed, but it also allows individual test cases to be run on a huge amount of variables i.e. devices, browser, locations and any combination of those things e.g. iPhone 7 on Safari with a tester based in Saudi Arabia.
Although the variables do not form part of the test case, they do form part of the test run/execution.
Actual outcomes
As part of the written test case, as you’ve seen we’ll detail expected outcomes. So, what happens when the test is run, and we want to track the actual outcomes?
The Digivante portal captures all of this. Once a test case is run, we track all outcomes in the portal. If the outcome is not as expected, our testers record details of this. They take screenshots and video evidence, which is always reviewer checked before being passed to clients, so you can be confident the issue could also be replicated by your teams.
The portal can also sync any issues found with Jira or similar tools.
Our best practices for creating test cases
So to summarise, we recommend following these best practices for creating your test cases.
1. Defined naming convention
Ensures consistent formatting and is therefore easier to understand test case coverage without having to go into the step detail.
2. Simple and clear instructions
Ensures coverage is understood by stakeholders, execution is consistent and issues raised refer to an understood test case.
3. Use case or scenario in mind for each test
Ensures the test case meets the requirements and therefore product quality is maintained.
4. Make them reusable
Starting from a baseline test case or test pack saves time and effort when testing similar features.
5. Have them reviewed before putting out to testers
Peer reviews ensure constant formatting, minimising mistakes while product owner reviews ensure the tests cover the requirements.
6. Ensure to include expected outcomes
Without expected outcomes, the results are not defined and therefore testers do not know if the test is successful or not.
7. Use a coverage matrix
A coverage matrix allows you to assess requirements for test coverage but also to display that coverage to the product owner. You may choose to reduce coverage based on risk and the matrix helps you assess the level of risk being taken.
8. Track outcomes
Tracking the outcome of test execution is critical. Knowing the pass/fail rates, trend analysis of test case executions over time, issue types raised and against what device/ browser, highlighting issues clusters etc. is all important to understand where to make incremental improvements going forwards.
If you need support or advice on test case writing for your business, or you’re interested in finding out more about our testing services, get in touch.